I'll start off by giving you some general information about myself. I have only been on Etsy a little over a month so I am new as well! I started this team because I wanted help learning how to gain sales and have a place to go for help and questions. I know there are other teams out there like ours but I wanted our team to be very personal and overwhelmingly responsive to its members. I do the very best I can to be involved with the team as much as possible. (Sorry I haven't been around much the past week. I am preparing for a charity auction that my items are being featured in so it has been hectic!) That is why we also have great leaders in the team to act in my place. Thank you guys your awesome!
I majored in college in photography and graphic design but my experience has been mostly limited to portraits and book cover design. My experience with still life objects, like we take for our shops, is limited to the few weeks I learned about it in school and my month here on etsy. I am not claiming to be a pro at these images and probably not everyone will like my style so it is important to find your own style that expresses you!
Camera-
It isn't necessary to have a top of the line expensive camera to produce great images. I use my point and shoot camera for my photos. It's too much to drag out the DSLR every time I want to take a few quick pictures.
Take some time to look through your camera's user manual. See what kind of settings your camera has. Some cameras have a symbol that looks like a tulip or flower. This is Macro mode and is great for taking pictures of small items such as jewelry. This setting will put your product in focus and blur the background which can give you a professional look. This is great if you take images outside and don't necessarily want your backyard in great detail! For jewelry it does great producing a detailed image of your small item.
I hardly ever use macro mode because my items are larger, but sometimes I want a close up of a zipper or of the print of the fabric. I could use it in these instances.
The best thing you can do starting out is to learn your camera and the functions it has. Choose a product and spend time changing the settings of your camera to produce the best image for your style.
Lighting-
Always, always,always use natural light if you can! You overhead light or lamps tend to make pictures yellowish in color. Sunlight carries every color (where as standard house light bulbs show yellow) so without getting into a huge lighting lesson it expresses your products color better and produces more professional looking images. Shooting near a window is great because it diffuses the light! Just always use natural light if you can!
Here are a few images I started out with on Etsy:


This image was the very first uploaded. This image is about 2 weeks later
Looking at both of these images now I'm not very thrilled with them because they didn't match my style. A lot of successful shops I have seen have images like these and they work for them. I don't believe there are too many major complaints but they just weren't for me.
The very first image I loaded (the brown and teal bag above) was taken on a coffee table that resides in my bedroom next to a window. I covered it with a sheet that I tacked on the wall behind it. You can see in the image lots of wrinkles in the sheet which bothered me and I wanted the background to be stark white but it is coming through as grey-ish. I do like the light in this particular picture. The problem that I tend to run into is that I live in an apartment building and the direction my building faces I never get direct sunlight. (It keeps the energy bill down but is a bummer for pictures!) There is also a lip to my building that sticks off very far so my window tends to be covered in shadow.
Direct harsh sunlight isn't always good for pictures but not enough sun isn't good either.
The second picture of the green and grey floral purse is taken on the same table. I went to a local thrift shop and found a large roll of white paper. The kind you might see a moving company using. It is about 4 feet wide by about a million feet long so it was perfect for a backdrop! I cut a piece long enough for what I needed and tacked it to the wall to hold the back drop in place and then smoothed it down around the table and taped in down. I was much happier with the second image but it was a rainy day and I didn't have a lot of sunlight. Here is an image of my current photo area:

As you can see its nothing fancy. In the left side of the picture you can see I have a tripod that I keep handy and on the right you can see the window I am near. An important note - This set up is one long piece of paper It is not cut at the table it simply smooths down around the table so there is no seam in the pictures.
During the day I open the shades all the way to bring in as much light as I can get when taking a photo.
For those of you who want to show your item hanging up you could use this same set up and simply attach your hook or whatever you are using to hang your item directly through the paper into the wall. I have thought about doing this to show my purses hanging up.
As some of you might have noticed my walls are white. So why do I bother with white paper? If you look closely and compare the paper and the wall the wall is not clean white like the paper. It is more of an egg shell as well it has a texture to it that was distracting. As well by wrapping the paper down the table you keep a "seam" (of the wall and table) from showing in the image.
This is a basic set up for any type of picture. No matter what color of background or style of picture you want to express this is a simple way to set up an image background. Maybe you are showing your item in a bowl for example set the bowl on the table (or any other staging item) if you catch some of the background in your image it will be white (or whatever your background color is) so it keeps the image clean.
(Again this is just my style and not a "rule" maybe you take outdoor photos or maybe your item won't fit on a table) For those of you who get a lot of sunlight this might be all you need but for me I didn't like the grey background I was getting from low light.
So how do I move my image:


from this To this?
(These images do not appear blurry on my shop so disregard the blogs settings)
I personally use www.fotofuze.com. I have photoshop and could use it to achieve the same affect but it is extremely quick and easy to use fotofuze. As well fotofuze lets you upload your images and list your item directly from their website as they are linked with Etsy so it may save you time.
Once you have signed up on fotofuze it will bring you to this screen:

Click the blue button "new etsy listing"
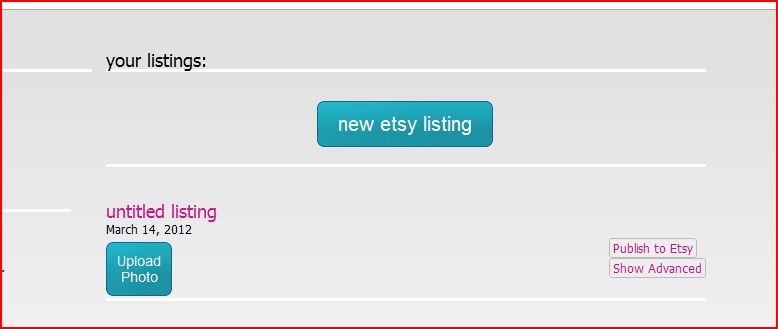
This will now give you an untitled listing the date and an "upload photo" button. push "upload photo"

As it says in the background : For best results, please take photos of your subject on a flat, white or black surface.
Click the grey "Upload Photo" button and go to the file you have saved your image on. Select the image you wish to edit.

It automatically sets your brush size to the largest brush (see the black dots to the top right of your image) select a smaller brush if needed. Also to the top right of the image see the marker emblems? The one automatically selected is the "magic marker". By using this marker you are allowing the program to "help" you as you highlight your image. I leave this feature turned on because for my images it tends to highlight shadows very accurately (we will get into that more in a few minuets). The marker beside the one selected is a regular marker it will only select what you select. The program will not "help" you. The emblem beside the marker is an eraser for any mistakes you or the program makes. The highlight shadow button tells the program to automatically highlight shadows it picks up in the image (again in a few minuets we will talk about shadows). The last button is a clear highlight button. It removes all highlights you and the program have placed.

I have now highlighted my product. I did this by simply placing the circle (at the bottom left in the picture) over the area I want to highlight and pressing the left mouse button. When I highlight my images I tend to keep the button compressed the entire time I am highlighting. I don't push and release the button over areas. I do this because while the button is compressed (and because I have my setting set as the "Magic Marker") the program takes over and helps me highlight and pick up on shadows.
If you notice I (and the program) did not go around the edges perfectly. If you try to highlight only the edges perfectly and don't over lap into your background some times it will do one of two things or possibly both. First it may not pick up the edge of your item so when you finish your picture your items edge is not there and it looks very unnatural and just weird. If you do this you will definitely notice when you review your image! The second thing that will happen is you may not pick up on any shadows cast.
If you look to the left of my bag you will see the program selected a lot of area that was not part of by bag. It did this because the program "sees" that there is a shadow area there. Also it picked up a gap in between my purse handle and my bag at the bottom of the purse. This is another shadow area. I recommend leaving these areas because if your background is stark white with no shadowing then it makes the product look as if its floating. By letting the program produce a shadow for you (again you must be on the "magic marker" setting for it to automatically do this) it gives your picture a more natural look while still creating the desired clean background.
If you choose to use the regular marker without the programs help you will need to pick the shadows out yourself. By simply going over the background it will not produce a shadow necessarily. Some sort of shadowed area must appear in the original image for it to turn your highlight into this. It can be complicated and time consuming to do this on your own with unnatural results. That is the main reason I leave the magic marker setting turned on!
You may notice the highlight is not straight it is a wobbly line. This is ok. The program is not going to mess up the image!
As you can see beside the image on the top right it has given me a preview of what my product will look like. You can see the shadows it has placed. Trust me on this, the preview is not the final product! Sometimes the highlights appear blotchy and not smooth. When the image is completely finished it will not look this way. I use this preview shot as a way to make sure I have the full image highlighted and that parts of my product aren't cut off. If you see that your product is cut off simply start clicking again and add more to the side that is cut off. You will probably need to overlap into the background and that's ok!
The preview updates as your are highlighting. If you start and stop highlighting it takes the preview a few minuets to catch up don't worry if it isn't showing an area you know is highlighted as white. Give it a few more seconds and it will catch up. Most of the time it will show you that it is loading but may be a little slow so just give it a few seconds.
Below the preview is a black box where it recommends areas that need to be highlighted. The box is black and the recommendations are highlighted in red. I usually do not put too much stock in this. If you can see that your product is highlighted well in the preview and you have put shadows into your image then leave it be! You don't have to have it perfect for a fantastic picture and sometimes the recommendations are wrong.
Remember that "highlight shadows" button we talked about early? If you press this button the program will automatically pick up the areas that need to be highlighted. If you use the magic marker and keep your mouse button compressed for the majority of the highlighting of your product, you usually don't need to use this. Don't go too completely crazy with highlights only what you think it needs.
Once you are happy with your highlight press the blue finish button (it is cut off in the above picture) Fotofuze will automatically take you back to the first page where you started a new listing. It will show you a a loading circle to indicate your photo is being worked on. Sometimes it takes only a few seconds sometimes (if the program is busy with lots of users) it takes a few minuets. While your image is being worked on by fotofuze you can click on the upload image button again to start editing your next photo.
To keep your images organized I recommend selecting upload image when you are working on 1 listing (so a min of 1 pic a max of 5 per etsy standards). When you are moving onto a new listing (different product) then select new listing. It will move the listing you were just working with down and open a new area with a new upload image button.
Once you have edited all 5 or so pictures for your listing it should look like this:

From here you can click on an image to see it full size. (by seeing the images you can tell that fotofuze is finished editing them. you won't see an image but a spinning circle telling you its still being worked on if the program isn't finished)
After making sure all of your images are the way you want them (if an image isn't the way you want it there is an edit button once you click the image to keep editing it.) you can choose to either save the images or publish them to Etsy through Fotofuze.
If you want to just save the images you can left click on the image to bring it to full size (like when you were viewing it) and then click the download button.
If you click publish to Etsy it brings up a box just like you see on Etsy to write up a description and select who made it when it was made materials tags ect. just like on Etsy.
The warning symbol you are seeing in this image is because it is telling me I haven't published the items to etsy. I have published this listing but I didn't do it through the Publish to Etsy button on the right side so I just disregard the warning symbols. If I was to click Publish to etsy and complete the listing and publish it then the warnings would go away. They aren't affecting your fotofuze account or Etsy account in any way!
Again this is a tutorial of one style of photography there are a million other possibilities for your photos.
Staging-
Maybe you want to show your product with a prop or show your item in use. These are great ways to draw attention to your photo or help the customer imagine themselves using the product. (if you choose to edit these with fotofuze simply highlight your model or your props along with the product!)
Think about something that expresses you or your item.
Here is a prop example:

This product is a Rice Pillow Cold Pack. So in the image I stacked my product on top of rice. It is a simple prop that may make someone stop and say "What is that?" Other props might include putting knitting needles into a ball of yarn you are selling. Or showing a model wearing your necklace. Maybe your prop is a tiny toy hippo standing next to your handcrafted notebook. Your prop doesn't necessarily have to go with the product if it expresses something about you and you think it will draw attention to the item.
I recommend you review your image and make sure the prop doesn't steal center stage from your product but when used effectively draws attention to the product.
I hope this tutorial has helped you. If you have any questions or comments please leave them in the thread on our team forum. If you leave comments here at the blog they may not be viewed by a leader as quickly as they will on our own team area.
Thank you for taking time to read this basic tutorial and I hope it helps!
Jennie
No Sales Team Captain
No comments:
Post a Comment